
Goblin Grotto - Add-On
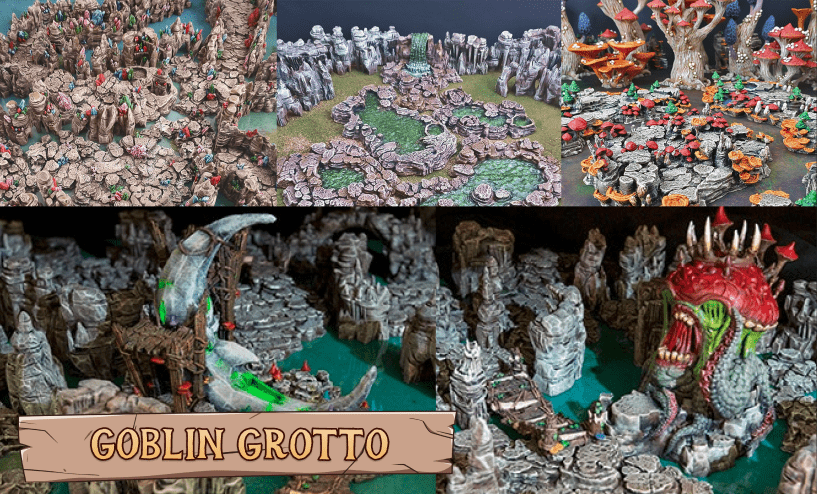
Sprawling caverns for your party to get lost. Watched by the strange flora and fauna growing by murky pools. But the glowing crystal treasures may make it all worthwhile.
This pack includes 230 terrain models and 7 scatter models.
See what original Printable Scenery products are included here
Models included (237)

E-TRP-GrottoFloor
2x2 Floor

U-TRP-GrottoFloor
4x4 Floor

R-TRP-GrottoFloor
4x2 Floor

S-TRP-GrottoFloor
2x1 Floor

I-TRP-GrottoFloor
1x1 Floor

F-TRP-GrottoFloor
2x2 Curved Floor

UH-TRP-GrottoFloor
UH - Floor

SB-Wall-GrottoWalls-v1.0
4x2x1 Wall

S-Wall-GrottoWalls-v1.0
2x2x1 Wall

IL-GrottoCavern-v1.0
Corner 1x2x1 Column

SA-Wall-GrottoWalls-v1.0
3x2x1 Wall

H-Wall-GrottoWalls-v1.0
2x2x1 Curved Wall

II-GrottoCavern-v1.0
1x2x1 Column

IO-GrottoCavern-v1.0
End 1x2x1 Column

S-Entrance-Wall-GrottoWalls-v1.0
2x2x1 Wall

SA-Entrance-Wall-GrottoCavern-v1.0
3x2x1 Wall

IT-GrottoCavern-v1.0
T-junction 1x2x1 Column

IX-GrottoCavern-v1.0
X-junction 1x2x1 Column

Grotto-Pool-C
Special Floor

Grotto-Pool-B
Special Floor

Grotto-Pool-F
Special Floor

Grotto-Pool-A
Special Floor

Grotto-Pool-G
Special Floor

Grotto-Pool-D
Special Floor

Grotto-Pool-E
Special Floor

Low-Cavern-Wall-8
Special Wall

Low-Cavern-Wall-11
Special Wall

Low-Cavern-Wall-5
Special Wall

Low-Cavern-Wall-9
Special Wall

Low-Cavern-Wall-3
Special Wall

Low-Cavern-Wall-12
Special Wall

Low-Cavern-Wall-2
Special Wall

Low-Cavern-Wall-6
Special Wall

Low-Cavern-Wall-7
Special Wall

Low-Cavern-Wall-1
Special Wall

Low-Cavern-Wall-10
Special Wall

Low-Cavern-Wall-4
Special Wall

GrottoWalls-90D-3Inch-v.1.0
Special Wall

GrottoWalls-60D-3Inch-v.1.0
Special Wall

GrottoWalls-60D-Column-v.1.0
Special Wall

GrottoWalls-45D-3Inch-v.1.0
Special Wall

GrottoWalls-90D-1Inch-v.1.0
Special Wall

GrottoWalls-120D-3Inch-v.1.0
Special Wall

GrottoWalls-45D-2Inch-v.1.0
Special Wall

GrottoWalls-120D-1Inch-v.1.0
Special Wall

GrottoWalls-60D-2Inch-v.1.0
Special Wall

GrottoWalls-60D-1Inch-v.1.0
Special Wall

GrottoWalls-90D-2Inch-v.1.0
Special Wall

GrottoWalls-120D-2Inch-v.1.0
Special Wall

GrottoWalls-45D-1Inch-v.1.0
Special Wall

1-Inch-CrystalCluster
None Scatter

2-Inch-CrystalCluster
None Scatter

3-Inch-CrystalCluster
None Scatter

RaisedCaverns-C
Special Floor

RaisedCaverns-G
Special Floor

RaisedCaverns-F
Special Floor

RaisedCaverns-A
Special Floor

RaisedCaverns-B
Special Floor

RaisedCaverns-D
Special Floor

RaisedCaverns-E
Special Floor

GrottoTunnels-Entrance
Special Tunnel

GrottoFloor-B
Special Floor

GrottoTunnels-NarrowStraight
Special Tunnel

GrottoTunnels-ShortStraight
Special Tunnel

GrottoFloor-E
Special Floor

GrottoFloor-C
Special Floor

GrottoTunnels-45degree
Special Tunnel

GrottoFloor-F-pt2
Special Floor

GrottoFloor-D
Special Floor

GrottoTunnels-90degree
Special Tunnel

GrottoTunnels-Y
Special Tunnel

GrottoFloor-A
Special Floor

GrottoTunnels-60degree
Special Tunnel

GrottoTunnels-T
Special Tunnel

GrottoTunnels-WideStraight
Special Tunnel

GrottoFloor-F-pt1
Special Floor

GrottoTunnels-S
Special Tunnel

GrottoTunnels-End
Special Tunnel

GrottoTunnels-X
Special Tunnel

DragonLair-D
Special Floor

DragonLair-B
Special Special

DragonLair-G
Special Special

DragonLair-E
Special Special

DragonLair-F
Special Floor

DragonLair-C
Special Special

DragonLair-A
Special Special

DragonLair-H
Special Special

RicketyBridge-3-Inch
Special Floor

GrottoBridge
Special Special

RicketyBridge-5-Inch
Special Special

RicketyBridge-4-Inch
Special Special

RicketyBridge-5-Inch-with-Mushrooms
Special Special

RicketyBridge-4-Inch-with-Mushrooms
Special Special

RicketyBridge-3-Inch-with-Mushrooms
Special Special

MagicMushroomCluster-B-Joined
None Scatter

MagicMushroomCluster-A-Joined
None Scatter

MagicMushroomCluster-C-Joined
None Scatter

Floor-AncientRuins-E
Special Floor

Floor-AncientRuins-A
Special Floor

Floor-AncientRuins-B
Special Floor

Floor-AncientRuins-D
Special Floor

Floor-AncientRuins-G
Special Floor

Floor-AncientRuins-C
Special Floor

Floor-AncientRuins-F
Special Floor

LanternCluster-B-2
Special Special

LanternCluster-C-1
Special Special

LanternCluster-Combined
None Scatter

ShroomGrottoWall-45-1-Inch-v1.0
Special Wall

CrystalGrottoWalls-60D-Column-v1.0
Special Wall

ShroomGrottoWall-60-2-Inch-v1.0
Special Wall

Grotto-Ramp-Transition
Special Transition

Grotto-Schist-Transition
Special Transition

CrystalGrottoWalls-45D-3Inch-v1.0
Special Wall

CrystalGrottoWalls-60D-2Inch-v1.0
Special Wall

CrystalGrottoWalls-90D-2Inch-v1.0
Special Wall

Grotto-HeavyWall-Transition
Special Transition

CrystalGrottoWalls-90D-1Inch-v1.0
Special Wall

CrystalGrottoWalls-90D-3Inch-v1.0
Special Wall

ShroomGrottoWall-45-2-Inch-v1.0
Special Wall

ShroomGrottoWall-60-3-Inch-v1.0
Special Wall

Grotto-Sewer-Transition
Special Transition

S-GrottoFloor-End-Transition
Special Transition

CrystalGrottoWalls-60D-1Inch-v1.0
Special Wall

CrystalGrottoWalls-60D-3Inch-v1.0
Special Wall

ShroomGrottoWall-90-2-Inch-v1.0
Special Wall

CrystalGrottoWalls-120D-1Inch-v1.0
Special Wall

CrystalGrottoWalls-45D-1Inch-v1.0
Special Wall

ShroomGrottoWall-45-3-Inch-v1.0
Special Wall

ShroomGrottoWall-90-3-Inch-v1.0
Special Wall

ShroomGrottoWall-60-1-Inch-v1.0
Special Wall

Grotto-Crypt-Transtion
Special Transition

CrystalGrottoWalls-120D-3Inch-v1.0
Special Wall

CrystalGrottoWalls-120D-2Inch-v1.0
Special Wall

CrystalGrottoWalls-45D-2Inch-v1.0
Special Wall

ShroomGrottoWall-120-1-Inch-v1.0
Special Wall

ShroomGrottoWall-90-1-Inch-v1.0
Special Wall

ShroomGrottoWall-120-2-Inch-v1.0
Special Wall

ShroomGrottoWall-120-3-Inch-v1.0
Special Wall

Grotto-Quarry-Transition
Special Transition

Grotto-Mine-Transition
Special Transition

Grotto-Beach-Transition
Special Transition

GoblinRubble-C
Special Wall

GoblinBarricade-D
Special Wall

GoblinRubble-B
Special Wall

GoblinBarricade-E
Special Wall

GoblinBarricade-C
Special Wall

GoblinRubble-A
Special Wall

GoblinBarricade-A
Special Wall

GoblinBarricade-B
Special Wall

GoblinBarricade-F
Special Wall

GoblinBarricade-G
Special Wall

ShroomGrottoFloor-F2-v1.1
Special Floor

ShroomGrottoFloor-A-v1.1
Special Floor

ShroomGrottoFloor-C-v1.1
Special Floor

ShroomGrottoFloor-B-v1.1
Special Floor

ShroomGrottoFloor-D-v1.0
Special Floor

ShroomGrottoFloor-E-v1.0
Special Floor

ShroomGrottoFloor-F1-v1.1
Special Floor

FaerieCircle-A
Special Column

Ramp-Grotto-2
Special Tunnel

FaerieCircle-C
Special Column

FaerieCircle-F
Special Column

CrystalGrottoFloor-A
Special Floor

FaerieCircle-D
Special Column

RaisedMushroomCaverns-A
Special Floor

FaerieCircle-Centre
Special Floor

Column-Grotto-Single
Special Column

CrystalGrottoFloor-D
Special Floor

RaisedMushroomCaverns-E
Special Floor

CrystalGrottoFloor-B
Special Floor

Column-Grotto-Extender
Special Column

CrystalGrottoFloor-E
Special Floor

FaerieCircle-Mushroom-B
Special Column

FaerieCircle-Mushroom-Centre
Special Floor

RaisedMushroomCaverns-B
Special Floor

Column-Grotto-Base
Special Column

Column-Grotto-Flat-Tip
Special Column

CrystalGrottoFloor-C
Special Floor

FaerieCircle-Mushroom-E
Special Column

RaisedMushroomCaverns-G
Special Floor

CrystalGrottoFloor-F-pt1
Special Floor

FaerieCircle-E
Special Column

RaisedMushroomCaverns-D
Special Floor

Column-Grotto-Single-long
Special Column

CrystalGrottoFloor-F-pt2
Special Floor

RaisedMushroomCaverns-F
Special Floor

Column-Grotto-Slope-Long-Tip
Special Column

Column-Grotto-Slope-Tip
Special Column

FaerieCircle-Mushroom-C
Special Column

FaerieCircle-Mushroom-D
Special Column

RaisedMushroomCaverns-C
Special Floor

Ramp-Grotto-1
Special Tunnel

FaerieCircle-B
Special Column

FaerieCircle-Mushroom-F
Special Column

FaerieCircle-Mushroom-A
Special Column

WickedWebs-G
Special Floor

WickedWebs-I
Special Special

WickedWebs-F
Special Floor

WickedWebs-E
Special Floor

WickedWebs-H
Special Special

WickedWebs-A
Special Special

WickedWebs-C
Special Special

WickedWebs-D
Special Special

WickedWebs-B
Special Special

Wyrm-Tunnel-Entrance
Special Tunnel

Wyrm-Tunnel-7inch-Narrow
Special Tunnel

Wyrm-Tunnel-4inch-Straight
Special Tunnel

Wyrm-Tunnel-90degree
Special Tunnel

Wyrm-Tunnel-Deadend
Special Tunnel

Wyrm-Tunnel-45degree
Special Tunnel

Wyrm-Tunnel-60degree
Special Tunnel

Wyrm-Tunnel-S
Special Tunnel

Wyrm-Tunnel-T
Special Tunnel

Wyrm-Tunnel-6inch-Wide
Special Tunnel

Wyrm-Tunnel-X
Special Tunnel

ShroomGrottoTunnels-Y
Special Tunnel

ShroomGrottoTunnels-NarrowStraight
Special Tunnel

ShroomGrottoTunnels-End
Special Tunnel

ShroomGrottoTunnels-S
Special Tunnel

ShroomGrottoTunnels-T
Special Tunnel

ShroomGrottoTunnels-WideStraight
Special Tunnel

ShroomGrottoTunnels-45
Special Tunnel

ShroomGrottoTunnels-60
Special Tunnel

ShroomGrottoTunnels-90
Special Tunnel

ShroomGrottoTunnels-X
Special Tunnel

ShroomGrottoTunnels-ShortStraight
Special Tunnel

CrystalGrottoTunnels-Entrance
Special Tunnel

CrystalGrottoTunnels-60degree
Special Tunnel

CrystalGrottoTunnels-End
Special Tunnel

CrystalGrottoTunnels-NarrowStraight
Special Tunnel

CrystalGrottoTunnels-S
Special Tunnel

CrystalGrottoTunnels-90degree
Special Tunnel

CrystalGrottoTunnels-ShortStraight
Special Tunnel

CrystalGrottoTunnels-WideStraight
Special Tunnel

CrystalGrottoTunnels-45degree
Special Tunnel

CrystalGrottoTunnels-T
Special Tunnel

CrystalGrottoTunnels-X
Special Tunnel